Tuesday, May 25, 2010
Craft Room Part 2
Well my craft area is finally complete. I have a few more things I'd like to do on the kid side but I'm happy with my half. This past weekend I finished moving some stuff, hung up my art/inspiration wall, painted shelves and hung hung them along with a board that holds my tools and inspiration pics. I am so in love with this space. Before I was in a small corner of our bedroom. It was more of a chore to craft there and now it feels like fun. I am so inspired in this space, I love looking at all my art. It's the one area of our house that I can say I decorated just for me. My husband bought the shelf and storage boxes as a mothers day present and everything else was either made, thrifted, already owned or came from TJMaxx/Marshalls. So without further ado here are the pictures.
Another shot of my reupholstered chair, just because I love it so.
Close up of the shelf, I keep the bulk of my craft supplies here and all of my favorite fabrics.
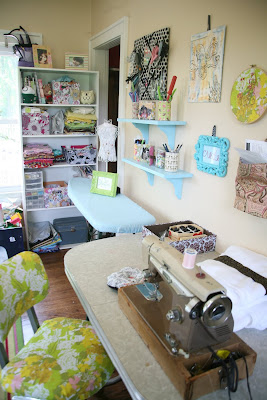
The sewing area. I've had a lot of questions about my machine and it is a vintage Emdeko, probably early 60's. It belonged to my grandmother. It is a great machine, very heavy duty. If you ever find one I suggest grabbing it up.
My ironing area, and a peek at the shelves. The holders are just food cans covered in scrapbook paper.
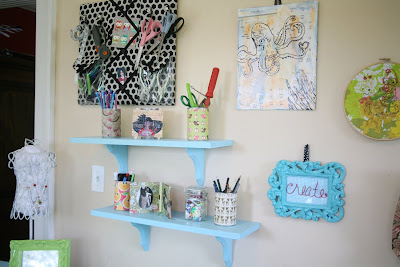
My shelves and storage board (TJMaxx) it has loops with snaps for all my scissors.
The art area, I made everything with the exception of the bird plaque.
One of my favorite projects from this room. I took a cute purse that was too small for my stuff, cut off the handles, shortened them and sewed one back onto the back as a loop to hang it from. Now I use it to store all my papers.
Another view.
Now to sew some presents! I hope this gives some inspiration on how to set up a craft room on a low budget (I spent about 150 total) and in a small space. If you have any questions or want more specifics on anything seen let me know.
Kim
Monday, May 24, 2010
List Trouble
Hi, my name is Kim and I am a chronic list maker. It's true I make lists. Lots of them. All of the time. It's kind of sick. I don't just make an occasional to do or grocery list, oh no. I make detailed crazy people lists and I'm actually pretty proud of it. It may be a little over the top but it's how I function. I make lists about birthday's and parties, gifts, chores and shopping. Then I also like to write down all of my ideas, like every one, in detail, with sketches. I like to write down my plans, each day. All of the things I need to do, what I'm going to eat for each meal. I think you are getting the idea, I write down a lot of stuff, but it does keep me grounded and focused as I'm a person whose mind tends to wander off quite a bit. The big problem with all this note taking was the fact that I took notes on everything, no scrap of paper was safe and I usually ended up losing half of my little lists and notes and remaking them. I have been doing this for years and can't believe that it just know occurred to me to buy notebooks. I bought two, a small one and a larger one to keep in the craft room. I can't believe how much more organized I feel. It's also inspiring to know that I have that little book and pen in my purse and can jot down ideas. I find that I'm coming up with more ideas or maybe just remembering more of them since they are in my little book. I've also started writing down my budget and all of my spending which is super helpful. Yes, I do know that most people are using their fancy iPhones and what have you for such tasks, but the husband won't buy me one so for now I use paper and pen. So I know this post isn't very crafty in nature as I didn't make the notebooks out of used cereal boxes and line them with paper made from dryer lint or anything, but it does make me more organized, which in turn makes me more crafty! As I've mentioned recently I'm all about the organization so what are some of your favorite organization tips?
Also in other news I have been updating my Etsy shop quite a bit and there are lots of fresh new things for sale. Here is a little sample.
Kim
Thursday, May 20, 2010
Fugly To Lovely- Ironing Board Cover With Tutorial
I'm embarrassed to admit that this ugly ironing board has been following me around for the last 8 years. We found it in our basement of our first house, which to me says it was too ugly for the previous owners to take with them. It is vintage, and we know I love vintage, but there is a point where no matter how vintage it is it's still gross and ugly. As you can see it has the ever elusive strawberry tree on it and is a lovely shade of poop green. God only knows why I have allowed this to hang around in this state for so long, I guess nobody but us ever really saw it. But things changed as I moved it down stairs this week to my new craft area. I mean the strawberry tree cannot coexist with Liberty of London, it just doesn't happen. But while it is ugly it is also very sturdy, folds up and is sort of a necessity if I want to sew. I figured chances were slim of finding a new cover for it since it seems bigger than the ones you can buy now. So I let the wheels of creativity turn, busted out some fabric from my stash and went to work. I figured why not share how I went about it with you lovelies.
Step one: Get some fabric, I used a cotton gingham, but ended up putting a second piece under the liner since I could see through it. So you may want to use a heavier weight home decor fabric. You need enough yardage to cover the length of your board plus about 8 inches. I used about 2 yards. My boards measurements were: 15x55 inches.
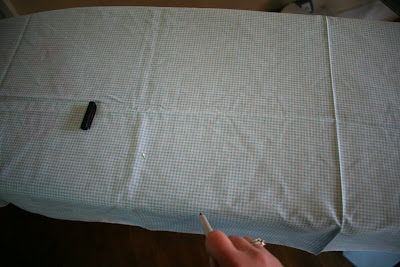
Step two: Lay your fabric on top of your board wrong side up. With a marking pen, sharpie, crayola or what ever is handy mark a dashed line around the shape of your board onto the fabric.
Step three: Once you get the shape marked lay it flat and mark four inches outside of your dashed line all the way around. You are basically adding a four inch seam allowance to the basic shape of the board.
Step four: Make a 1/4 inch hem all the way around and stitch. You could skip this step and just press it but I find it's easier to get the elastic through if you stitch it.
Step five: Fold down about 1 1/2 - 2 inches to make a casing, press and pin. Stitch all the way around leaving a 2 inch opening at one end. When going around the curved areas I sort of made little pleats to keep it rounded and take up the excess fabric. I'm sure their is another better way, probably clipping it or something like you do when making clothes. But this worked and doesn't look too bad so meh.
Step six: Attach a safety pin to one end of about 2 yards of 3/4 inch wide elastic. I found the wide elastic made it stronger and not so flimsy if that makes sense. Thread it through your casing. Sew the two ends of elastic together where they meet. Sew up the opening.
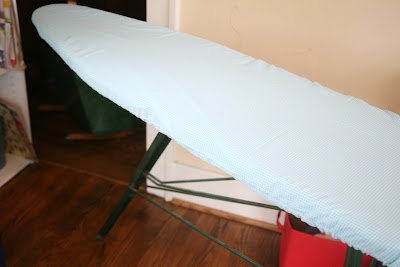
Step seven: Try on your new cover and if you're like me marvel at the fact that it actually fits and looks good!
Step eight: Have small children demand that you put a large piece of fabric over your hard work and allow them to use your ironing board as a fort!
So now I want to get the husband to spray paint the legs for me, because he does a much better job at it than I do. He has patience for an even coat, I pile it on and end up with crazy drips everywhere. But for now it is so much better than it was! I hope this helps some of you out to maybe cover an ugly board or one that has been burned. I swear it is so much easier to be inspired when you are working in a lovely space. If you have any questions I'm happy to answer them!
Wednesday, May 19, 2010
What's Happening?
My pretty organized cabinet.
Pretty new marker and colored pencil bins. These are cans from peanuts covered with scrapbook paper.This week has been crazy for me. Lots of running about to school functions, the welcoming of my new niece on Mother's Day, dealing with cleaning out our basement and flooding of our basement (although the husband did most of that), planning a birthday party for the kids, organizing anything not tied down, moving my craft area to a new room and designing my new space, making two new areas for the kids to play and a myriad of craft projects to complete the above listed projects. I have been busy, busy. I've literally sat down to write this about 5 times, getting a sentence here and there! So anyway I thought I would share some of the highlights of what I've been up to. I'm sure you will be seeing many more updates about this craft room/playroom area that I am doing as it appears it will be several weeks in the making. I had originally planned on doing it in a weekend, but I was a little over enthusiastic. Basically we took our sunroom which use to be a playroom for the kids and took everything out and made a giant playroom for them in the basement. Then I took half of the room and made an arts/crafts area for the kids, a reading area for the kids, a shelf for Bug's trucks and a table for Sweets tree house and all of the Calico Critters and Puppies in My Pocket. The other half of the room houses my bookshelve with all of my crafty stuff neatly organized and my sewing area. I'm knee deep in this project right now and have a lot I want to do. I've been getting a lot of my organization ideas from here: http://j-a-girl.blogspot.com/
Here is the new crafty shelf
The kids art shelf
A piece of embroidery I made for the wall
Details: I used a free pattern from Andrea Zuill available here: http://zuill.us/andreablog/2008/03/27/aprils-free-pattern-ready-for-on-that-is-a-bit-more-difficult/
I embroidered this on a piece of vintage sheet.
My newly reupholstered vintage office chair
Details: I bought the chair for 19.99 at a Peddlars Mall, along with a still in package vintage sheet for 6 dollars and after lots of cursing, removing a thousand screws, bending some dangerous looking hooks out, cutting, stapling and re-screwing in a thousand screws I have my new adorable office chair. I LOVE it so much! The sheet was a full size too, so I have plans to make an Amy Butler gumdrop pillow for the room out of it also.
So that is what I have been doing, what's new with you?
Thursday, May 6, 2010
Cold Brewed Coffee
I am a huge fan of those overpriced iced coffee drinks that are usually full of sugar and fat, but not a fan of the 5 dollar price tag. A few weeks ago I ordered a skinny one from Starbucks and I swear it came in a child size cup and they charged me fifty extra cents for soy milk making it five dollars and fifty cents. I drank it in three drinks and swore never again. I had tried before to make them myself and while they tasted good they weren't coffee shop good. Then I stumbled across the directions for cold brewing coffee at SmittenKitchen. I tried it the next night, brewing 1/3 cup of coffee with 1 1/2 cups cold water in a bowl overnight or twelve hours. I honestly didn't think it would make that big of a difference. The next morning I sifted it through a coffee filter, fixed two glasses up half coffee, half cold milk, some ice cubes and in mine a little stevia and a shot of sugar free chocolate syrup. I added a straw, since I wanted to feel like it was coffees shop like. I took a sip and oh, my, goodness. Heaven. It tasted just like the coffee shop I literally drank it all before I had a chance to snap a photo. The husband enjoyed his also and we did it again the next night. I am going to be brewing my coffee every night like this so I can have my delicious sugar free, fat free coffee drink. Next i am going to try the cinnamon version and I'm going to be on the lookout for a sugar free caramel syrup. If you love iced coffee you have to try this.
Wednesday, May 5, 2010
Teacher Appreciation Week- Days 2-5
So initially I had only intended on giving the teachers one gift this week, until when they thanked me for Mondays gift the teacher said, " Thank you so much, we wouldn't even had known it was Teacher Appreciation Week if it hadn't been for you" what?! Apparently we are the only parents who gave them anything this week. Come on folks it's public school, you're kid goes for free, cough up a few bucks and get the teachers a little something! GEEZ. So I immediately came home and set about ideas for everyday of the week. I'm only doing everyday for her two main teachers. So for day two I baked some homemade bread, ran to the store and grabbed some gourmet jams, came home and found some new dish clothes in my crafting bin and used the clothes to wrap the bread in straight out of the oven. I tied a ribbon around it and a cute little hand drawn tag and ran to school. The bread was still warm when I got there and the teachers seemed stunned. "But you already gave us a gift" they said. I replied with "you deserve something everyday". People passed by and commented on the smell of the bread. It was great and they were super happy.
Today Sweets took in little bags of gourmet nuts with a hand drawn tag that read 'We know sometimes the kids may drive you NUTS, but thanks for all you do' I didn't get a picture of these. For tomorrow we have some beautiful little notebooks I picked up with a tag that says 'Just a little note to say we think you are special'.
Friday is an aromatherapy eye mask with a gourmet chocolate bar attached and the tag 'You deserve a break, thanks for being so special'.
In slightly related news, I have found the most unbelievable blog. I heart it big time. It may be my first official blog crush. This lady is kind of my hero and when you see her amazing ideas and adorable home you are going to love her too. She pretty much has revolutionized the way I think about organization. This weekend things are going to change around here. After reading all of her posts on organization I went into my bathroom last night and pretty much cussed it out. I told the cabinet that it was a disgrace and the shelf should be ashamed of itself. Just wait until I start with the cabinets downstairs, they'll never want to show their faces around here again. I've been running around saying "organization station" like a crazy person. So any way check her out please I promise you will not be sorry! Just a Girl
Kim
Saturday, May 1, 2010
Teacher Appreciation Week- Don't Forget!
Next week, May 3-7 is Teacher Appreciation Week. I personally think that teachers are some of the most important people in our kids lives and we should do everything we can to help make their jobs easier and show our appreciation. I'm not sure about in the past but this year the celebration happens to fall on the same week as Mother's Day. So if you are like me you are probably feeling a little pressed for time and money. I hit the stores today with a couple of ideas, but no real direction. I figured I would know a good idea when I saw it. I also had five teachers to buy for. Sweets has two teachers in her class room and a music, art and P.E. teacher who she sees on a daily basis. I couldn't leave anybody out, she loves them all and they enrich her life so much. So after walking around aimlessly for an hour or so ( I had to decide on Mother's Day gifts too) I finally stumbled upon some cute reusable water bottles. Oh, I should also mention that part of my criteria included no junk, nothing with apples on it, no mugs or anything else they have an abundance of and no big boxes of candy. I figure they probably get a lot of crap every year ( no offense, it's the thought that counts) so I wanted to get them something they would use. These were really nice bottles but they only had two and the price wasn't really affordable enough for me to get five of them. So I bought the two for her classroom teachers, picked up some individually wrapped chocolates and some energy jelly beans ( who knew?) and headed off to the dollar store. At the dollar store I found reusable water bottles that were just plain and grabbed three. I then got some packs of gum which came five for a dollar, some boxes of individual packets of lemonade which came ten for a dollar and some granola bars ten for a dollar fifty. I then headed home and added some individually wrapped tea bags, some packets of stevia and individual packets of coffee. It filled the bottles up perfectly. I had bought some little bars of chocolate to add to them but they didn't fit through the opening. So next I went to Avery Print and Design which is a free site where you can design cards, flyers, stickers whatever and print them on Avery products. I had some double sided business cards so I used a template for that with cute little flowers. I then changed the text to add the teachers names and a message which reads "Just a little something to get you through the week". I printed them punched a hole in the corner and tied them on the handles, then I added some pretty ribbon and done! I think these came out cute and are perfect if you have a lot of teachers to give to, they would also be good party favors. I'm going to really have to come up with a good idea for next year when Bug starts school and we have nine teachers total to give gifts to! Sorry about the photo quality, I took these on my craft table and apparently the lighting in there is the worst ever!
Subscribe to:
Posts (Atom)


